This past evening, I completed cutting scores through the length of the log and then began doing some bulk removal of wood. Starting at the top end of the log, I worked my way down toward the butt-end, removing the wood left between the notches. In the crotch area (I can't write that without chuckling a little), the depth of the wood was fairly shallow relative to the line, and I had cut broad, shallow notches there. I removed most of this wood first, taking swings closely along the grain with my felling axe. All of this wood cleared fairly easily, leaving the promise of some very interesting grain patterns behind, including what looks like some spalting. This is exactly what I was hoping for:
However, I avoided removing too much wood right near the end of the stem on the left side of the log, being somewhat concerned about the large split emanating from the pith. That split has been there since the log was cut, but I don't want to disturb it too much with axe impacts, out of fear of making the split wider, or even breaking a large portion of the stem off. So instead, I'll remove the rest of this wood using a small hatchet, or even a chisel. I may eventually put a stainless steel screw through the stem to hold it together. Or, perhaps, if I really wanted to get fancy, a butterfly key made from a section of black walnut I've been holding onto for just such an occasion, inserted into the end of the stem and made flush. Any suggestions or other ideas?
The mid-section of the log was also very problematic, as it consisted of a large bulge and the vestigial knot of a limb that had been removed from the tree a long time ago. The wood in this section was very deep, as you can see from the photo. So I decided to make this part of the log a candidate for splitting, according to my ever evolving plan. I cut two deep, narrow notches on each side of the knot (the highest clump of wood in the photo is the one holding the knot):
And then I went to get ... my splitting maul!
Ah, yes, my splitting maul easily strikes fear into the heart(wood)s of logs that otherwise eat chainsaws for breakfast. It made fast work of the first clump just behind the one containing the knot, in merely three strikes:
But the knot seemed not the least bit shaken, and clearly was mocking me as I cleared away shattered wood from the first clump:
Well, my splitting maul decimated nearly all of the clump containing the knot, as well as the next clump right below it. But admittedly, the maul bounced off the knot one or two times. That knot was determined not to be disturbed:
At this point, I was tired and decided to call it quits for the evening. I cleared away some of the wood on either side of the knot using my felling axe, but the core of the knot is still there. An effort to return to some other day:
Here's a view of the surface of the log just above the knot. I still need to shave some wood down to the layout line on this side, and there also is a slight bulge in the very center of this area that I need to take down a bit, as well:
The other side was generally right down to the line. You can see the black crayon line on the side of the log, just below the cut, in the foreground of the photo. Also note the interesting demarcation between the lighter layer of sapwood, and the darker heart wood in the center of the log:
Counting crows....My usual spectators also came by to watch at one point. Can you spot all the crows in this tree? There also was one on the ground at the time, but I couldn't get all of them into the photo:
Tuesday, March 31, 2009
Thursday, March 26, 2009
Timbering, Part IV -- Scoring
Scoring is the removal of significant amounts of wood from one side of a log, as the first step in squaring the log into a flat-sided timber. I finally began scoring my maple workbench slab-top a few days ago. But alas, other demands on my time are destined to keep this a background project. However, I am long overdue for a blog update, and thought a short article describing the scoring process might be welcomed by those who are interested.
The scoring process essentially consists of cutting a sequence of notches along each side of the log that you intend to square. If you can imagine these first three notches continuing all the way down the length of the log, you get the basic idea:
The intent is to cut the notches to the depth of the layout lines running along the sides of the log. In other words, each notch just about touches the lines on either side of the log, while the bottom of each notch is just deep enough to meet the plane intersecting the two lines.
Of course, in practice, you can never cut them that precisely -- they either go a little too deep, resulting in axe marks in the timber face that you might need to smooth later on (e.g. using an adze), or they don't go quite deeply enough, so you have that much more wood to remove when you subsequently hew (square) the timber face with your broad axe. When I took the photos above, I had not yet finished cutting these notches all the way down to the lines.
Once the notches are cut, the next step is to remove the wood between them. Usually, this is accomplished by taking relatively horizontal strikes at the wood chunks between the notches, using the felling axe. However, because this is such a large log, I'll first split the chunks with a maul, and then clear the broken-up material with my felling axe.
Traditionally, scoring is done while standing atop the log, with the side being scored positioned vertically, as the gentleman in this photograph is doing:
Standing on the log actually makes quite a bit of sense. If you were out in the forest doing this, you could avoid standing on wet, muddy, or uneven ground. Furthermore, you could allow the weight of the axe to do most of the work, while you simply guide it to the target. However, in my case, the maple trunk is too large and too irregularly shaped to make this a comfortable position. Furthermore, the breadth of the trunk also makes it that much more difficult to gauge where the axe is striking, relative to the layout lines.
So, I have chosen instead to keep the face of the log horizontal while I score it. And with my ultra-simple and highly flexible hewing/bucking cradle, there is an advantage to doing it this way, since I can readily rotate the log to any angular position, and then securely lock it in place.
This means that I can begin cutting a notch on the horizontal face, rotate the log slightly toward me, and then continue cutting the notch toward the far side, while generally being able to see how close I am to the line. I can then rotate the log the other way to cut to the line on the near side of the log. All this can be accomplished while standing in the same position, and consistently moving the axe with the same basic motion, striking at about a 45 degree angle, toward the butt-end of the log:
For example, in the photograph below, I had already started the first notch, and then wanted to cut down to the line on the far side. So I tilted the log to the left and secured it...
...and then continued my cut toward the far line:
And, yes, I admit it -- I cut just a little too far on this one, striking just below the line at one point. But this is precisely why I allowed myself a 2" margin between the lines and the final slab surface.
In the photo below-left, I've released the movable supports and used a peavey to rotate the log in the other direction (away from me), so I can continue cutting the notch toward the near line. The below-right photo shows the log locked in place:
You can see that I got a cleaner cut this time -- just about as close to the line as I wanted it:
I'll post more photos as soon I finish cutting the remaining notches on this face of the log. In the mean time, I'll keep swinging and striking, while those crows keep a-cawing and a-mocking... :-)
[ The weight of an ax-head poised aloft, The grip of earth on outspread feet - Robert Frost ]
Wednesday, March 18, 2009
Two Tramps in Mud Time
These two characters appeared on my roof the other afternoon while I was out in the yard pursuing my timber-shaping activities. They made quite a racket. At one point, both of them were leaning forward and cawing in rapid succession, in unison, like two over-zealous spectators at a football game.
Given the axe in my hands, it reminded me of a line from a poem of the same name as this posting, by Robert Frost: "Out of the mud two strangers came and caught me splitting wood in the yard, And one of them put me off my aim by hailing cheerily 'Hit them hard!'"
For some reason, there is a rather large number of crows around here that seem to just love my yard. They congregate here frequently on summer afternoons, often in pairs, some times even in threes. Often, they land on my roof, and I can hear the tap tap tap as they perch on the rain gutter just above the window of my study.
Here are two more photos I took last fall. The first is of a crow perched in my dogwood tree. You can't tell from the photo, but it was a very blustery afternoon, and he was riding up and down with the wind, until he finally decided to fly elsewhere. In the second photo, another crow is pacing the front yard:
There have been many interesting crow sightings here. Unfortunately, they are usually gone, though, by the time I manage to get my camera. I also make it a point not to leave anything small and valuable (like my camera) unattended in the yard, lest one of these little thieves should decide to pinch it.
Monday, March 16, 2009
Cradle Design and Operation in Detail
Several people had asked for a more detailed description of the log cradle's construction and how it works. So I've published some more photos focusing on the cradle itself. Here they are:
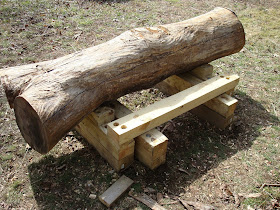
The cradle consists primarily of a stationary stand, comprised of two supports, each of which consists of two 6 x 6 pressure treated pine posts, cut to four foot lengths, and fastened together with lag screws. There is also a four foot long 4 x 6 post that acts as a brace and ties the two supports together, giving them stability. Each support also has a chock fastened to it, about 4" inward from the brace. The chocks are cut from a 4 x 6 post, and are beveled at a 45 degree angle. The photo above shows the stationary stand, with the maple log rolled back a bit to give an unobstructed view.
The photo above shows the stand, from the other side.
The other two supports are shown above. These are the movable supports. Each is also comprised of two 6 x 6 x 4' posts and a chock, all fastened together with lag screws, just like the supports in the stationary stand. Note that the two chocks in the photo above come from opposite sides of the same cut of a 4 x 6 post. My 4-1/4" circular saw, beveled at 45 degrees, can't cut the post all the way through, so I cut one side, and then repeated the cut on the other side. Only I just didn't get the second kerf to quite meet the first one. Hence, the little ridge in the middle of the slanted face of each chock. (Turns out that that little ridge enhances the mechanical keying of the face of the chock when pressed against the log surface -- it's an unintentional optimization!)
The above photo shows the other side of the stand, with the two movable supports positioned along side the stationary supports and slightly under the log. I use the pickaroon at the far side of the photo to pick one end of a support up from the ground, so I can get a grip on it without having to bend my back.
In the photo above, I am using a log peavey to roll the log back toward the other end of the stationary stand, until it more or less comes in contact with the chocks on that side.
A couple of sharp taps from a sledge (a sixteen-pounder in the photo above) forces the movable support under the log until its chock makes contact with the log surface.
The photo above shows the view from the over side. The movable support is the same height as the fixed support, and just clears the underside of the brace.
Above, both movable supports have been tapped into place, with their wedges securely locking the log. If you need to re-position the log for some reason (e.g., you need to cut on another face), the easiest thing to do is tap one (or both) of the movable supports from the other side to release the log a little, use the peavey to rotate the log, and then tap the movable supports back in place to securely lock the log again. Note that the movable supports do not require a brace like the stationary ones do. In fact, you wouldn't want one, because the movable supports need to be free to move independently of one another (they have a way of "finding their place" when they are driven up against the log).
Finally, the photo above shows the stationary stand and the two movable supports, with the log completely locked in place, from the other side of the cradle.
Saturday, March 14, 2009
Timbering, Part III -- Drawing Layout Lines
Now that the weather is considerably more temperate, I decided to return to my (nearly perennial) workbench slab-top project. In the dead of winter, I began constructing a hewing/bucking cradle from a simple design that was churning in my head. The cradle consists of two stationary elements braced together, two moving elements, and two pairs of opposing wedges, or chocks, fixed to the elements.
Sure, I could have notched some logs and created something simpler that would've worked. But I wanted a cradle that was very stable and also usable for logs of any size. With my design, once the log is on the fixed portion of the cradle, a few good taps from a sledgehammer drives the movable elements in, completely locking the log between the chocks. The photo below shows the maple trunk securely held in the cradle:
I did some fine tuning of the cradle the past few evenings. Basically, I shortened the chocks a bit to provide a little more clearance on both sides of the log. I also deeply counter-sank the lag screws fastening the chocks and brace to the elements, just in case a misguided axe were to come down on top of one of the screw heads. Having the heads deeply recessed in the wood minimizes the chances of damaging the cutting edge of the axe bit.
This morning, I started scribing a layout for the slab. Nominally, I want the slab to be uniformly 6" thick. But I am allowing an extra 2" on the top of the slab to absorb any inadvertently deep scoring strikes, as well as to accommodate the infinite amount of planing I am ultimately going to have to do to achieve a fair surface on the bench top. Starting at the butt-end of the log, I used a level to draw two horizontal, parallel lines, 8" apart, with the pith of the log just about in the center of the nominal 6" slab. You can see those lines in the photo above.
I then drew a pair of lines in the same manner on the two stems at the top end of the log. This is pictured in the photo below:
Of course, the stem on the left is too small to accommodate the lower line. But so be it. It will be very interesting to see how this crotch turns out in the final table. Let it be rough and funky; the slab top is the only place where I demand a precise surface.
The next step was to scribe lines on each side of the log, intersecting with the upper horizontal lines at each end. This was going to be tricky; were the log straight, a simple chalk line would've sufficed. But this log is extremely irregular, and highly concave on one side. So I tried fastening a long, aluminum angle on the extremely concave side, with each end fastened just slightly below the heights of the upper lines at each end of the log. The angle is sufficiently rigid, of course, so as not to sag, and I fastened it at each end of the log with wood screws:
Then, I took my log scribe, which is basically a compass with adjustable levels built into it, and, making sure to keep the scribe in a level plane, ran it along the length of the angle, with its attached pencil drawing a scoring line length-wise along the side of the log. This seemed work reasonably well, though it was tricky keeping the scribe level, and I had to stop every so often to either extend, retract, or adjust the angle of, the pencil to keep it in contact with the log surface:
Next, I fastened the angle to the other side of the log, and similarly scribed a line:
To make the lines stand out better (and hopefully last a little longer), I finally took a large, black crayon, and traced it on top of the lines on both sides, as well as at the ends:
The butt-end of the log is about 20" in diameter. My guess is that I will not end up removing very much material from either side of the slab; rather, adze them to eliminate any high spots and get them reasonably planer. I may attempt to make the less concave of the two sides completely straight, but I haven't quite decided yet.
However, what I am contemplating for the extremely concave side (the side shown in the photo above) is shaping yet another, smaller slab, with a straight side and the other side crescent-shaped and convex, so as to key into the concave side of the first slab. In this case, the bench top will be generally rectangular, though composed of two interlocking "leaves" (so to speak). It will be approximately 24"-26" in width, except at the upper end, where the stems of the crotch measure about 31" across.
So now the first maple log is all set for scoring, and then hewing. All I need to do is get my axes honed, roll my sleeves up, and get to it...which is much easier said than done! This last photo is of my broad axe (hewing) and felling axe (scoring), both waiting to get tuned up (maybe on Sunday):
Friday, March 13, 2009
Today in History: The Return of Halley's Comet
Edmund Halley, FRS (1656-1742)
It was 250 years ago today that Halley's Comet is recorded as having reached perihelion (i.e., closest distance to the sun) in its 1758-1759 return to the inner solar system. Of course, this comet has been orbiting the sun for eons. But what made this particular approach significant is that it had been predicted in advance by the English Astronomer Edmund Halley, in 1705.
Halley had been analyzing past comet sightings. He concluded that several observations of comets in the years 1456, 1531, 1607, and 1682, were actually appearances of the same comet, and he predicted that this periodic comet would re-appear in 1758. The comet did indeed appear on the 25th of December, 1758, and reached perihelion on the 13th of the following March. Henceforth, this comet became known as Halley's Comet.
Halley went on to succeed John Flamsteed as Astronomer Royal, in 1720. It is personally interesting to me, of course, that the Hawkins family undoubtedly observed Halley's comet in the winter of 1681-1682. Joseph Hawkins lived until October, 1682, leaving this world at the age of forty. The particular circumstances of his early demise are unknown, although a great many people died at relatively young ages in the early colonial settlements, compared to their contemporaries back in Europe (Halley himself lived to be 85, and Flamsteed lived to 73).
What I find profound about the comet is the manner in which it unites people across generations. I saw it myself in 1986. So did my parents. My father was alive, though very young, during its 1910 appearance. My mother had not been born yet. I doubt I will see its return in 2061 -- I'll be one hundred and one years old. But who knows? Maybe. Those of us who have experienced at least one lifetime sighting of Halley's Comet should consider ourselves to be very fortunate, indeed!
The nucleus of Halley's Comet, photographed by the European space probe Giotto, during the comet's 1986 fly-by.