Screed: noun \ˈskrēd\ 1) A lengthy discourse (e.g., personal account, or rant); 2) A leveling device drawn over freshly poured concrete [Source: Merriam-Webster]. A screeded concrete surface is usually finished with a float. For this article (which itself is a screed), snow is the metaphorical concrete, the North wind is the screed, and the float is, well, ... an actual float.
January 26
th-27
th brought us yet another intense winter storm. In our area, the storm dropped about 14"of snow – not quite as much as we'd received two weeks ago. But the total snow accumulation for the month of January was about 52", setting a record for the snowiest January here since 1965. And cold temperatures ensured the older snow stayed around, so accumulations both on the ground and on the tops of structures were quite deep.This caused numerous collapsing roofs here in Connecticut, and many folks are making efforts right now to remove roof-top snow.
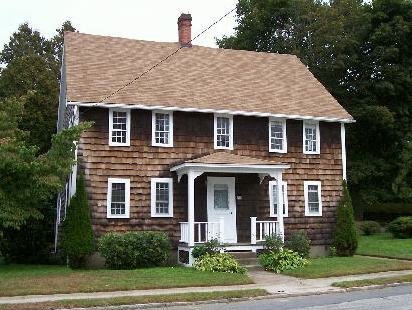
In a
previous post, I'd written how my home faces north-west, the same direction (more or less) that winter storms tend to blow from in this area. My main roof has a 10" pitch and presents a large profile to the wind, causing lots of snow to blow over the ridge and get deposited on the rear and mud room roofs. Furthermore, the front of the house blocks wind at lower levels, often causing a large build-up of snow on the entry porch roof and in the front yard. So I wasn't totally surprised to see this after the storm:

Needless to say, I'm glad I sistered the columns with 2x6 Ts before the winter. They're not in the greatest shape these days, but I hadn't had time to properly replace them in the fall. The mud room roof also had much snow, and my first priority was to get both porches cleared, which I can safely do with a shop broom from overlooking windows. But what really worried me was the cumulative snow on the back main roof:

Furthermore, the current forecast calls for more snow next week, or possibly even rain. So I really wanted to remove as much of it as possible. I needed something like a roof rake, but with about a 40' extension. I'm not sure roof rakes actually come that long, but it really didn't matter, as no one around here actually stocks roof rakes, and supplies weren't expected until sometime the following week.
But it turned out I had something easily adaptable: A four foot magnesium concrete float and several sections of aluminum shaft that screw together. I ran out to Home Depot and bought a few more sections so I could get the total length I needed. A bit pricey, yes, but I was determined to get this all done as quickly as possible:

First thing I had to do was remove the attachment point from the float, re-orient it 90 degrees, and bolt it back on:

Then, I angled the attachment point at about to about 45 degrees, and screwed one of the aluminum sections on:

My reasoning was that this would enable the float to ride up over the surface of the snow on the up-stroke, and then anchor into the snow on the down-stroke, thus breaking chunks of snow free. I collected everything together, and then headed out to the back of the house:

Not long after, my good friend and nextdoor neighbor Gary Farrell came over to see what I was up to (I think he probably realizes by now that I'm a little crazy). Gary grew up in the Hawkins house, which his family had owned since about 1853, and he had been the steward of the place for a good many years until I bought the house from him in 2007:

While Gary watched with some curiosity, I made my first attempt to get the float up and anchored in the snow just above the eaves. Only two shaft sections were attached. It wasn't quite as easy to do as I initially thought it would be. Once I got it in place, I attached a third section:

It took six sections to get the float just beyond the ridge line, at which point, the float tilted a bit, requiring me to push it a bit higher and spin the shaft to straighten it:

Meanwhile, Gary went back to clearing his side porch roof. I was a little leery watching him up there, hoping the porch roof was strong enough to support his weight and all that snow. I offered him to try out my experimental method, but he seemed quite content to continue with what he was doing (like I said, he knows I'm crazy -- everybody does :-) :

But soon enough, I cut my first swath of snow with the float. I found that shimmying the float would easily dig it in, and then a slight up and down undulation loosened the snow and released a small slough:

Once I had cut the first swath, I drove the float upwards again and attempted the next one (you can see how some portions of the first few sloughs settled on the mud room roof):

Then, I momentarily anchored the float up on the ridge, and took a minute to rest (and snapped this photo, too, of course), while the float waited patiently:

Next, I worked the float over a few feet and began cutting the next swath:

Controlling the float was tricky and took quite a bit of practice. Sometimes, the float would want to veer off to one side, and I'd have to move quickly across the ground (not easy with a lot of deep snow underfoot) and get back under it to make it stop:

In general, the more surface snow removed, the more challenging the float became to control, as it would want to slide across the exposed lower slab, which was hard-packed and icy:

Another point of difficulty was the need to occasionally add or remove a section or two of shaft, depending on how high the snow was where I was standing, versus where I was trying to get the float positioned on the roof:

In this case, another pair of hands was indispensable, and Gary provided me quite a bit of help in getting the job done (in addition to taking some good action pics):

Toward the end of the afternoon, I managed to remove most of the upper layers of snow from the roof. In the photo below, I only needed to clear a bit more snow from the vicinity of the main stack vent, which was effectively buried. But I stayed well clear of the rake line, given the float's tendency to slide sideways:

Needless to say, there was a lot of new snow on the mud room roof. I went back inside and removed it from the safety of the windows. Only I needed a shovel in addition to the shop broom, because this fine, sloughed-off snow had set-up hard (in fact, exactly in the same manner that slough sets up like concrete after an avalanche in the mountains). There was also a lot of displaced snow all around the perimeter of the mudroom and house, which now needed to be removed:

But at least it wasn't on the roof any more, and I had no further concerns about additional precipitation during the coming week.
Some Important Points on Safety and Property DamageDespite my relative success with this project, I don't necessarily advise my readers to attempt the same. There are a number of risks associated with undertakings such as this one, and although I was able to eliminate or minimize the major ones, this might not always be possible in another person's situation. The major risks include, but are not limited to:
- Potential for electrocution. Aluminum is an excellent conductor of electricity. Sending a long aluminum shaft aloft while standing in wet snow could be a very dangerous thing to do in the presence of overhead wires (e.g., power company service drop, or feeder to an out-building), or any other sources of electric power. In my case, there were no electrical wires nearby, and my service drop is clear on the opposite side of the house. Had it not been, or had I needed to clear snow from the front roof, I would've requested the power company to shut my power off first, and not resume service until I told them I had completed my work. Otherwise, I never would've attempted this. On the other hand, there are several outdoor light fixtures just beneath the eaves where I was working, but I de-energized their circuits beforehand. Note that a roof rake with a wood, plastic, or fiberglass shaft is arguably safer, but still shouldn't be used in the vicinity of live wires, or any other electrical sources or fixtures. Remember: That shaft is going to have a continuous stream of water dripping down its length, and on to your hands and body.
- Damage and/or injury from falling snow. Even though these falling sloughs were relatively small, we were surprised by the impact they made hitting the ground. There should be no bystanders (especially small children) or easily damaged property, in the fall zone. Furthermore, if conditions are right -- fresh snow, or fresh snow over a consolidated, older layer of snow, and a very steep roof – you have the potential for triggering a small avalanche, in which more snow than you're expecting can suddenly free itself from the roof. The reason why I used so many extensions, in fact, was to deliberately distance myself as far as possible from the falling sloughs.
- Damage and/or injury from the shaft/float. As I mentioned earlier, the float was difficult to control, and had a tendency to slide sideways, as the extended shaft is not very rigid. Again, no one should be in the fall zone, nor at either end of the house. There is also a potential for the butt end of the shaft to hit you in the face or body, if not properly controlled. Finally, rain gutters and nearby windows are also at risk for damage.
- Damage to roof shingles. It would be easy to tear or knock off more than a few shingles doing this. In my case, I had good reason to believe there was at least one hard, base layer of snow covering the shingles, and took care not to penetrate it.
- Build-up on other structures. As one reader pointed out in a comment, care should be taken to avoid too much snow building up on the roofs of smaller, attached or nearby structures. Be mindful of where the cleared snow is going and what it ends up resting on.
- Physical injury. I found this work required far more physical exertion than shovelling heavy snow from a side walk. I wouldn't recommend it to any one who wasn't in exceptional shape.
The bottom line here is: If you're concerned about the quantity of snow on your roof, please hire a licensed and insured contractor to remove it!
Postscript [8 February 2011]
Since writing this article, it's become apparent to me that I could make the float less damaging to the shingles by attaching door weather stripping, or a section of foam pipe insulation, to the bottom edge.