Monday, January 7, 2008

Second Floor

Next on the virtual house tour is a visit to the second floor. If you have not already done so, reviewing the house plan might help put these images into perspective.


Above: This is the main entrance of the Hall Chamber, with the landing just beyond the door. Hall Chamber is an old term for master bedroom. Just below this room, on the first floor, is the Hall (Great Room, Keeping Room, or Sitting Room), which was the main gathering area for the family, and what we might think of today as being a combination of a formal living room and dining room. Opposite the Hall was a minor room called the Parlor. So the two upstairs bedrooms just above the Hall and Parlor were sometimes referred to as the Hall Chamber and Parlor Chamber, respectively. Just to the left and above the door is a finished (boxed-over) post-and-beam assembly (the west end of bent #3 in the floor plan).


Above left: The second floor landing, looking into the Parlor Chamber. Another finished post-and-beam is visible here.

Above right: The floor of the landing looks very old, but the boards are narrower and have straighter cuts than the original planks. The Hall Chamber flooring is nearly identical to that of the landing. My guess is that these are replacement floors that were laid down sometime in the nineteenth century. Given the higher elevation of the Hall Chamber's floor, the original planks might still be underneath.


Above left: Another view of the landing, rail, and a very naked butterfly table.

Above right: The view down the stairs....watch your step! :-)


Above left: This doorway is just above the stairs and open to the chimney area.

Above right: Inside the Parlor Chamber, looking back toward the landing.


Above left: Floor planks in the Parlor Chamber.

Above right: North corner of the Parlor Chamber with another finished post-and-beam (part of bent #1) and 9/6 and 12/8 windows.


Above left: The other end of the Parlor Chamber and the interior post of the bent.

Above right: Corner of the Parlor Chamber looking toward the Spinning Room. The closed door on the right is another doorway into the chimney area.
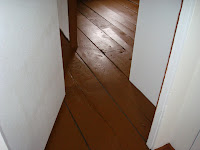


Above left: Floor at the junction of the Parlor Chamber, Northeast Chamber, and Spinning Room.

Above right: This is the Northeast Chamber, which was in the process of being converted to a second floor bathroom and has quite a bit of exposed plumbing. I may eventually complete this conversion, but am not totally decided on whether or not I want the Northeast Chamber to serve as a bath, as the partition defining this room is one of the oldest interior structures in the house. Furthermore, the existing floor joists could never support heavy bathroom fixtures. They would need to be sistered with modern dimensional joists or steel. So I will not be making any decisions along these lines for some time yet.


Above: Two more views of the Northeast Chamber.


Above left: View facing out the door of the Northeast Chamber into the Spinning Room and the Southeast Chamber just beyond.

Above right: The interior of the Spinning Room, with two exposed posts on each side of the window.

Above left: A close-up of one of the posts. This is the Northeast exterior post of bent #2. Note the two draw pegs in the tie-beam. The vertical steel rod was added some time back in the 1940's-1950's to provide more stability to the beam just below.
Above right: The other exposed post. I would bet that, just on the other side of the visible portions of these posts and tie-beams, classic English tying joints are holding the posts, beams, wall plate, and principal rafters together.


Above left: An old L-nail protrudes from one of the Spinning Room tie-beams.
Above right: A view of the Spinning Room floor and doorway to the Southeast Chamber.


Above left: View from the Spinning Room into the Southeast Chamber.
Above right: The closed brown door on the right conceals the attic stair.


Above: Looking into the Southeast Chamber. Finished post-and-beam and 6/6 window.


Above left: A very old and very small closet door. Above right: East-facing 12/8 window.


Above: Floor planks in the Southeast Chamber.


Above left: Stool and broken planking just beyond. Above right: Junction of Hall Chamber closet, Southeast Chamber, and Spinning Room.


Above left: Looking back into the Spinning Room from the Southeast Chamber. Above right: Closed doors in the Southeast Chamber.
Next stop on the virtual tour: Hall chamber (Home)

Wednesday, January 2, 2008

A Brief Tour of the Attic

Given its unfinished state, the attic readily reveals a great deal about the design and construction of the house. Here are some images of the attic, along with commentary.


Above Left. This curious epithet appears on one of the roof planks. I know nothing of its provenance, but would imagine that, some time around the 100th anniversary of the house’s construction, some one decided to mark the occasion by painting this message in a location where it was unlikely to get covered or destroyed. If my theory is correct, then this bit of colonial graffiti just slightly pre-dates the signing of the Declaration of Independence. My only regret is that the author didn’t include their own name and date they wrote it. If I am still around on the 350th anniversary of the house – 2025 (the same year that those super-high full moons return, by the way) – I will likewise inscribe a similar commemoration right next to this one.

Above Right. This photo attempts to capture as much of the roof system as possible. The Hawkins house has nine rafter pairs, comprised of 6 x 6 timbers, which is in sharp contrast to the relatively smaller dimensional lumber used in the roofing systems of modern, stud-framed homes. Although not obvious from this photo, there is no ridge beam connecting the rafter peaks. Furthermore, each rafter pair is tied with a 4 x 6 collar tie, positioned exactly half-way along the length of each rafter. The only exception to this is the fifth rafter pair, which butts-up against the chimney and therefore lacks a collar tie. The roof line is quite high, being 12’ over the attic floor, and the roof exhibits a classic 12-in-12 pitch; that is, a 12’ rise and a 12’ run, resulting in a 45 degree slope.

The roof and walls are sheathed with large oak planks, varying from 12” to 15" in width, and consistently 1 ½” thick. At the far end of the photo (which shows the North end of the house), you can see that the wall planks are hung vertically, just as you might find in an old barn. They are fastened directly to the exterior sides of the major framing members, a style of sheathing referred to as vertical plank-on-timber. I’ve been told that these planks, which were pit-sawn by hand back in those days, had also been soaked in lime as a preservative. In any event, the over-built construction of the Hawkins house, combined with the fact that it was owned by only two families, both of whom were committed to its long-term preservation, explains how the house has survived for so long.


Above Left. This is another view of the roof and vertical wall planking in the vicinity of the North end. The two planks nearest the window display a very odd discoloration just above the first collar tie, but the wood otherwise appears to be in good shape.

Above Right. This is a close-up of two abutting vertical planks. Through the gap between the planks, you can see the original clapboards forming the exterior wall. Nowadays, the clapboards are covered with a layer of cedar shakes, so they are no longer visible from outside the house.

Above Left. This photo shows the peak of the first rafter pair. The rafters are joined via an open through-mortise-and-tenon (the rafter on the left is the tenoned one), and the wooden peg drawing them together is plainly visible.

Above Right. This photo shows the collar tie of the third rafter pair, joined to the tenoned rafter. A lapped half-dovetail joint is used. Note that both collar tie and rafter are scribed with a “III”, designating them as belonging to the third rafter pair. Each of the rafters is also marked with a "III" near the peak. You can also see in the photo that the next collar tie is likewise marked as "IIII". The reason for marking them in this manner (with so called marrying numbers) is that all of these members were initially layed-out, cut, and fitted, while on the ground. After the bents were raised, the rafter pairs and collar ties were subsequently joined after being brought aloft. The builders needed to keep track of how the members were to be re-fitted, hence the scribed numerals.

Above Left. This photo shows a close-up of the tenoned rafter and collar tie of rafter pair IIII. Note the scoring marks on the side of the rafter, which had been smoothed somewhat with an adze.

Above Right. This is the back of collar tie VII. There is a waney edge at the top, with some remaining bark. It also looks like some ancient bugs decided at various times that this was a good place to stop for lunch (just like me dropping-in at Mattie’s on Route 34). Recently, I found a very small pile of saw dust on the attic floor, directly under one of these holes, so apparently the wood still tastes pretty good after all these years. I’ll have to take care of this soon… ;-)
Next stop on the virtual tour: Second floor (Home)