Sunday, September 27, 2009

Vintage Bird's Eye Views of Derby and the Old Hawkins House

Recently, I discovered two bird's eye view illustrated maps of Derby, one from 1920, the other from 1898. Both are digitally archived by the Library of Congress. And each contains an image of the Hawkins house, situated at its present location, on Hawkins Street.

The first map, City of Derby, Connecticut, was published by Hughes and Bailey in 1920. While its illustrations are not necessarily drawn to scale, this map reveals a remarkable amount of information about the town, its streets, its buildings, and their relationships to one another.


Hughes and Bailey's "City of Derby, Connecticut" illustrated map (source: Library of Congress)

When I zoomed-in on the intersection of Hawkins Street and Seymour Avenue, I found a surprisingly detailed rendering of the Hawkins house. In the expanded illustration below, it is right at dead-center of the image. The house appears to be drawn largely out of scale with regard to most of the neighboring houses and other features, and I can not readily account for why it was drawn in this manner. The fact that the house originally stood on a large, raised foundation might have skewed the artist's perspective, while another possibility is that the artist considered it a significant landmark, and drew it out of scale to emphasize it as such.


Close-up of Hughes and Bailey's "City of Derby, Connecticut" map, showing the vicinity of the intersection of Hawkins Street and Seymour Avenue (source: Library of Congress)

Zooming even closer in on the house revealed a number of its most prominent features. The large center chimney is there, and is represented as being slightly offset from the ridge line, toward the back of the house. I know that this had, in fact, been the case, as it's obvious from the roof system in the attic. The raised foundation is also captured in the illustration, as are the three descending windows on the first floor of the south end.


Zooming further in on Hughes and Bailey's "City of Derby, Connecticut" map reveals an accurately detailed image of the Hawkins house (source: Library of Congress)

Finally, the three old homes directly across the street are also shown, with fairly reasonable spatial relationships to my home. The only significant error in this rendering is that the artist appears to have included a third window on the second floor of the south end, whereas in reality, there are only two.

The other map, published by Landis and Hughes, and entitled Derby & Shelton, East Derby, Conn. 1898, is shown below, with a red rectangle delineating the area of the intersection of Hawkins Street and Seymour Avenue.


Landis and Hughes' "Derby & Shelton, East Derby, Conn. 1898" illustrated map (source: Library of Congress)

Zooming-in on Hawkins Street reveals what appears to be the Hawkins house correctly situated between Tenth and Eleventh Streets, and generally in correct relation to the same three old homes on the opposite side of the street. However, the representations of the buildings themselves are rather boilerplate and lack any significant detail.


Close-up of Landis and Hughes' "Derby & Shelton, East Derby, Conn. 1898" map, showing Hawkins, Tenth, and Eventh Streets (source: Library of Congress)

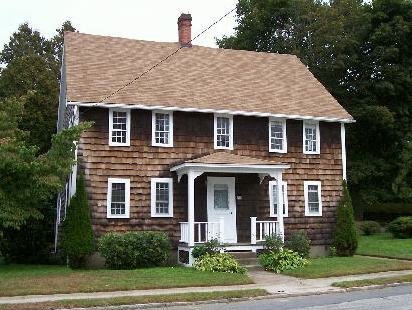
My discovery of these illustrations -- the Hughes and Bailey map, primarily -- is significant in the sense that it tightens up a loose end in the history of the house; namely, the exact location of the original home site. While it is generally accepted that the house was moved to its current location in the 1950s to avoid the wrecking ball during the construction of Connecticut Route 8, there had always been some uncertainty as to where the house actually came from.

Although it had always ostensibly been associated with Hawkins Street (Samuel Orcutt's History of The Olde Town of Derby, for example, often states this to be the case), several nineteenth century cartographers failed to accurately record the location of the house on scaled maps. And, perhaps as a result of this, more recent architectural surveys of Derby missed the house entirely. This situation is, in fact, described in a Derby Historical Society article published just a few years ago. However, the Hughes and Bailey map strongly suggests that the present-day Hawkins Street location is also the original seventeenth century home site.

Right after discovering this, I thought: If this is the original site, then what traces of the old foundation might yet remain? And it suddenly struck me that I'd been staring at the old foundation all along, in the outline of the somewhat odd, modern concrete pavement currently surrounding the south-end and back of the house. It just never had occurred to me before that moment.


Above left: The ca. 1939 photo of the Hawkins house, with raised foundation extending out beyond the back of the house, a stone staircase, and an overhead awning where the mudroom is now located. Above right: The modern stonework surrounding the south end and back of the house appears to conform exactly to the outline of the previous raised foundation.

As you can see from the two photos shown above, the modern stonework aligns perfectly with the grade-level footprint of the old raised foundation. And the peculiar "landing from nowhere" abutting the concrete slab in the photo on the right almost certainly appears to have been the base of the old stone staircase shown in the 1939 photo on the left. My guess is that these modern concrete slabs are actually capping a large number of old dry-laid stones that had comprised the lowest-level courses of the original foundation.

So, my conclusion is that the Hawkins house had been re-situated at its original site when it was moved in the 1950s. Not only is this conclusion supported by physical evidence, but it is also consistent with claims by contemporary Gaynor-Farrell family descendants that my home had, in fact, been moved twice during the 1940s-1950s, with the first move relocating it to a point on Hawkins Street that today is somewhere within the vicinity of the east abutment of the Hawkins Street bridge. While the exact reason for moving the house to that particular location is not well-remembered, the location itself is still strongly upheld as such by the Gaynor-Farrell family.

Clearly, the second move of the 1950s simply returned the house to the location from whence it originally came, albeit to a modern foundation of concrete blocks constructed within the confines of what had been the old foundation, with most of the original, dry-laid stones having long been removed and taken away.

For a related article, see The Old Hawkins House.

Postscript
Since publishing this article, I've discovered yet another illustrated map of Derby, entitled Birmingham, Conn. 1876. The particular rendering of this map that I initially came across is printed on p. 6 of the Derby Historical Society's Images of America: Derby (Arcadia Publishing, 1999), and carries the label "Wilkinson Brothers & Co., Derby Paper Mills."

However, Randy Ritter, of the Derby Historical Society, informed me that the map had been created by O. H. Bailey, and that an online copy is maintained by the Norman B. Leventhal Map Center of the Boston Public Library. The 1876 map is shown below (and many thanks to Randy for the link).


Bailey's "Birmingham, Conn. 1876" illustrated map, with a red rectangle pin-pointing the location of the Hawkins house and surrounding homes (source: Boston Public Library)

Zooming-in on the vicinity of Hawkins Street reveals the Hawkins house and the various surrounding homes and structures. It's interesting to note that the large colonial house with double-ended chimneys that today sits directly across the street from the Hawkins house had not yet been built in 1876. This house is, however, represented in both the 1898 and 1920 maps.


Close-up of Bailey's "Birmingham, Conn. 1876" map, showing the Hawkins house and adjacent homes (source: Boston Public Library)

Another interesting aspect of the 1876 map is that it illustrates the gentle dip of land that once existed just behind the Hawkins house. Today, Connecticut Route 8 cuts through this area, just where the dip begins to drop more steeply (as shown in the old illustration), as a considerable amount of the original land behind the Hawkins house had been excavated away.

According to my neighbor Gary Farrell, his uncle, Len Gaynor, had had a herd of cows grazing on this land, as recently as the early 1950s. An old cow shed and stone wall still exist behind Gary's house, the only surviving remnants of those earlier times.
Friday, September 18, 2009

Hewing a Roubo Workbench Slab

Some of you may recall that earlier in the spring, I began working in earnest (well, sort of) on a green-wood carpentry project to construct a Roubo-style joiner's bench from several large sections of a very old silver maple on my property that I needed to take down the previous year. This had become something of a background project that I'd regularly put aside for stretches at a time to honor more pressing commitments, and then return to whenever I found a spare hour or two.


Jacques Andre Roubo's bench, from Plate 11 of L'Art du Menuisier (ca. 1769)

This past week, I declared success in removing bulk wood from the large maple log that eventually will yield a slab for the bench top. A hefty cant (although I actually rather enjoy calling it a proto-slab) had finally emerged from the log:


So, on a brisk, but very sunny, early-fall afternoon, I began hewing (or, shaping) the cant:


For any one unfamiliar with the techniques and tools being described, the earlier process of bulk wood removal (scoring) was accomplished using a traditional felling axe to essentially slice away sections of wood within the boundaries of scoring lines drawn on the log. Scoring lines basically define the intended shape of the timber.

Hewing, on the other hand, also involves wood removal, but is more focused on defining and squaring-up the actual sides of the timber. This is accomplished primarily with a broad axe, which, compared to the felling axe, has a wider cutting edge, a much shorter handle, and is considerably heavy for its relatively small size. A broad axe is used, in general, to shape wood.

The photo below shows a face of the cant up-close. The face is oriented vertically, using an adjustable cradle that I had built specifically for this purpose. You can easily differentiate the hewed area on the left from the scored area on the right:


One strikes the broad axe about thirty degrees to the direction of the wood grain (not necessarily as shown in the photo above), using a series of short, well-controlled strokes. The cutting edge must be kept extremely sharp to avoid tearing the wood, as well as to minimize the number of strokes required to do the job. Since the axe head is quite heavy, you don't need to force the stroke that much; rather, just initiate the stroke and allow the weight of the head to do most of the work.

You do need, however, to use quite a bit of muscular effort to carefully control the placement and angle of the blade. So it can be rather tiring work. During the initial hewing, we're mainly concerned with clearing out the roughly scored wood and leaving just a reasonably clean surface. On subsequent iterations, we'll attempt to smooth and flatten the surface as much as possible, periodically checking it with a level or plumb-bob.

Of course, the ultimate goal is to shape the cant into a relatively flat and squared slab of wood suitable for fashioning into a precise bench top. This means that one face (the top of the slab) must be as planar as possible. The other face (the bottom) need not be that perfect, but it should still be reasonably clear. And at least one of the two lateral edges must be completely planar and at a right angle to the top so as to accommodate stock being edge-planed. So these are the requirements for true-ness that the hewing process ultimately needs to support (not to mention the countless hours of planing that will ultimately follow hewing).

In an effort to make this work as precise as possible, I cut a reference edge along one of the scoring lines at one end of the cant, and pared it down to a smooth, straight surface:


The reference edge provides a good, solid place to position a level or plumb-bob to ensure that the cant is always in the same orientation every time I return to hewing it. It's simply easier to hold the level against a squared piece of wood than attempt to align it with a drawn scoring line. Periodically, while hewing the faces, I'll check this reference edge to make sure its completely vertical, just in case the cant shifted slightly while being worked. I'll also check the area of the face I'm currently working with a plumb-bob to ensure that it's heading in the direction of relative planarity, with a parallel orientation to the reference edge.

If I happen to flip the cant over onto one of its faces, I'll likewise make sure that the same reference edge is completely horizontal as the cant lays in its cradle, adjusting or shimming the cant as necessary. I might then attempt, for example, to hew either of the edges into a vertical planar surface, or perhaps adze the exposed face to remove more material using a different group of muscles. As hewing progresses, I would expect to occasionally establish other reference edges at various locations on the cant, as well.

The photo below shows the reference edge. I used a small carpenter's hatchet to finish the edge to a straight line:


This next photo shows the hewed surface of the stem where the reference edge was cut. When you take great care to use the broad axe precisely, you can get a surface that is nearly as smooth as what could be accomplished with a hand plane. Although the photo might not do an ideal job revealing it, this is the case right in center area of the upper stem, where a rough oval of spalt can be seen. Note also the beautiful bands of colors (including the silver-blue) running through the surface of the wood. This will eventually make for a beautiful bench top when finally finished:


Yet another view of the cant is shown below. The face of the cant shown here (and in the preceding photo, as well) is destined to be the bench top, and the bottom edge (the edge the cant is currently resting on in its cradle) will be the front edge of the bench. This particular face was selected as the bench top mainly because the bottom edge exhibits far less sweep (or end-to-end curvature) than the top edge, and will be that much easier to straighten:


And since this edge will face the woodworker, it must be shaped so as to form a vertically planar clamping surface with the bench legs on that side. I also intend to fashion the smaller branching stem into a crochet for holding the far end of stock secured to the bench-front for edge planing. That should make for a very functional and also aesthetically pleasing feature of the bench.

The bifurcated area of the cant, where the two stems of the living tree had split-off from the main trunk into a Y-shape, was perhaps my single biggest motivation for using this particular log for the slab. In addition to providing a base for an integral crochet, I am anticipating that its additional mass will add to the overall heft and stability of the bench. And from a purely aesthetic perspective, the wood in such areas of trees often yields myriad unusual coloration and grain patterns, lending itself quite well to the creation of a unique piece of furniture.

So, it is for all of these reasons that I am constructing a bench top from a whole section of a silver maple, rather than assembling one from pre-fabricated slabs or milled lumber. Not to mention the fact that the tree had been in my yard for many years; hence, using it in this manner also provides quite a bit of meaning and relevance.

Tuesday, September 8, 2009

Tobacco Cloth Curtains and Other Developments

Some primitive-style window coverings I had ordered arrived this morning at the house. These consisted of several tobacco cloth tie-up panels, and a pair of double-draw festoons. I purchased them from Farmhouse Primitives, and was very pleased with their customer care ethic, as they made an extra effort to ship them to me as quickly as possible. Since these coverings are only made on-demand, the orders naturally take a little extra time to fulfill.

The use of tobacco cloth as a window covering is something that has long intrigued me. Being a descendant of Georgia turpentiners and tobacco planters, I harbor something of a misplaced romanticism for the nicotiana tabacum, despite the long history of evils associated with its cultivation and use -- slavery and cancer, of course, topping that list.


Newly arrived tobacco cloth tie-ups adorning two front windows of the hall chamber. This room is currently empty due to my removing wall board and inspecting this section of the house frame.

Furthermore, my house had once been part of a large colonial plantation whose main product was tobacco. In the later half of the seventeenth century, tobacco was the big craze consuming Europe, beginning with the Portuguese, then the French, and finally the English. Many planters in the American colonies profited handsomely from growing tobacco and exporting it back to England. This was not only the case in the southern colonies, but here in New England, as well.

In fact, nearby Hartford, Connecticut, to this very day, has a reputation for being the shade tobacco capital of the world. As you're driving into Hartford on I-91, you'll see shade tobacco farms with large coverings of tobacco cloth stretched over the crops to protect them from sunlight. This had traditionally been the main use for tobacco cloth, although it was also used extensively for packing tobacco for shipment. It's various domestic uses in earlier times -- as a cheese cloth, for brewing tea, as window treatments, etc. -- are also well known. It's conceivable that centuries ago, tobacco cloth might have been used in the Hawkins House for these same purposes. Hence, it can be put to good use as a period artifact in my home.


Another view of the new tie-ups in the front windows. As the windows are somewhat small, the tie-ups look a bit large, but c'est la vie. I generally prefer coverings that hang close to the floor, anyway, and according to the weaver's instructions, they'll shrink a bit when washed in cold water.

Anyway, after unpacking my new window coverings, I wanted to try them out immediately. I am still not totally sure where they will ultimately go, but the hall is a definite possibility. The parlor is another. Since I was working upstairs anyway, I decided to place them in the hall windows. Some of you may recall a post from last winter, where I found that heavier linen drawback festoons -- by the same textile manufacturer as the tobacco cloth coverings, by the way -- made a good winter time covering for these windows, as they provided a decent block between the cold column of air hovering about the windows and the rest of the warm air circulating through the room.

However, as nice as the heavier linen festoons are, they simply carry too much material and some how just don't seem to fit the house well in the summer months. It looks like these tobacco tie-ups, on the other hand, are a perfect substitute: They are light and airy, and still have a primitive style to them that suits the house quite well. So I am definitely going to be utilizing these tie-ups and similar lighter coverings in the warmer months.


The third tie-up on the larger 12/8 window on the end wall of the room. Unfortunately, there was a lot of sun light coming in, so the photo is a little washed out.

I also ordered a pair of left- and right-sided double-draw festoons, which are heavier than the tobacco cloth, but still a bit thinner than the heavy single-draw linen festoons. According to Farmhouse Primitives, these coverings are based on an early 1800s design. I liked these very much as well. They are probably going to end up in the dining room, where I am currently considering introducing a lot of red fabrics (runners, table squares, etc.), anyway.


One the double-draw festoons in the same window. Again, the large quantity of sunlight unfortunately backlights the festoon and reveals its draw-pull mechanism. But the downstairs windows are darker, so these should work just fine downstairs.

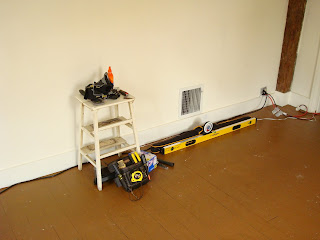
On another note, you may have noticed that these are some of the first interior photos of the house showing exposed timbers in one of the main rooms. The reason why is because I have finally initiated a systematic, detailed inspection of the entire house frame, something I had planned to do for a long time, but given the effort involved, had habitually postponed.

However, my recent discovery of termite damage in one of the front posts motivated me to re-prioritize and begin this lengthy inspection and assessment now, rather than putting it off any further. I anticipate this process lasting throughout the fall and well into the winter months, but it will also provide a lot of good fodder for further blogging. So expect many more postings on this topic as this effort builds momentum!


Wherever I am, my tools are never far away. Here, I was using the level essentially as a large straight-edge with an attached protractor to measure how close my posts are to being plumb. The interior post in the background leans a whopping 5 degrees toward the south end of the house, while the partition wall itself leans several degrees in the other direction (need I be concerned...???)